
Microsoft Planner Tutorial Everything You Need To Know Microsoft Planner is a task management tool that’s part of the Office 365 suite.
It helps teams organize, assign, and track tasks, facilitating better collaboration and productivity. Here’s a detailed guide to help you get started and make the most out of Microsoft Planner.
1. Getting Started with Microsoft Planner
Daftar Isi
Accessing Microsoft Planner:
- Log in to your Office 365 account.
- Navigate to the app launcher (the grid icon in the top-left corner).
- Select “Planner” from the list of available apps.
Creating a New Plan:
- Click on “New Plan.”
- Enter a name for your plan.
- Choose whether you want the plan to be Public (accessible to everyone in your organization) or Private (only accessible to team members you add).
- Click “Create Plan.”
2. Planner Hub Overview
Planner Hub:
- The Planner Hub is your main dashboard where you can see all the plans you are a part of.
- It provides an overview of your tasks and their status.
My Tasks:
- This section shows all tasks assigned to you across all plans, providing a centralized view of your responsibilities.
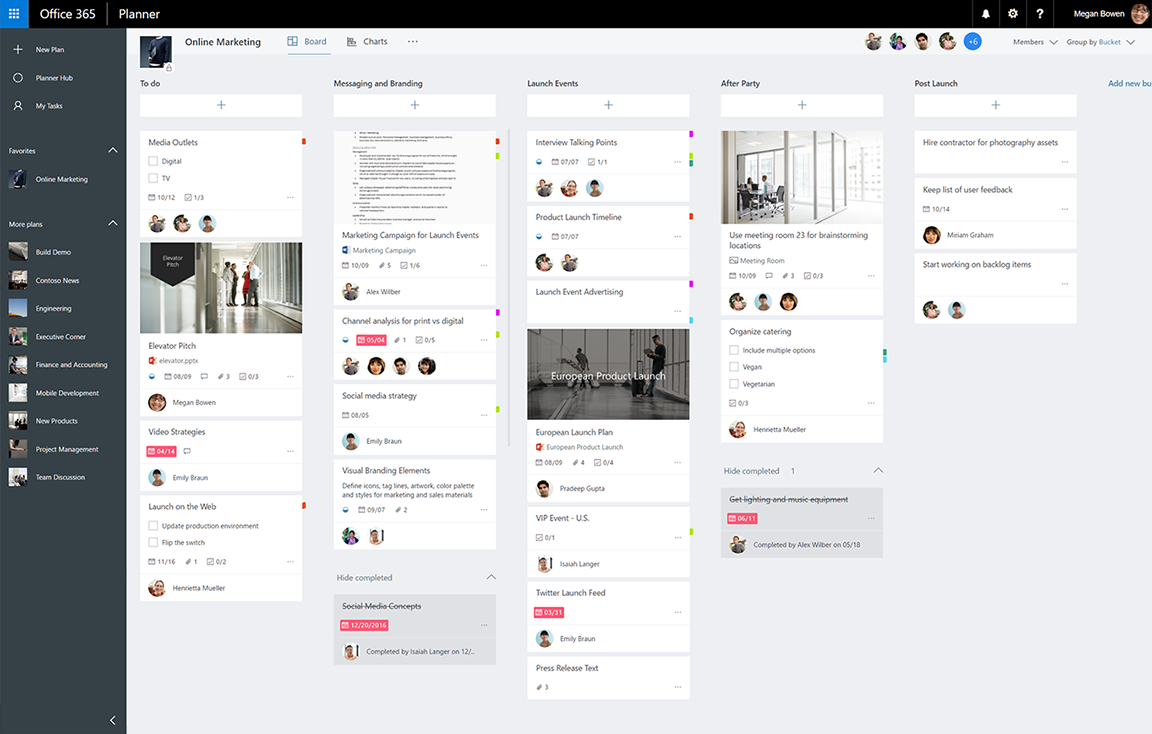
3. Understanding Plan Structure
Buckets:
- Buckets are categories within a plan used to organize tasks. For example, you can create buckets like “To Do,” “In Progress,” and “Completed.”
- To add a bucket, click “Add new bucket” and enter a name.
Tasks:
- Tasks are individual items or pieces of work within a bucket.
- To create a task, click on “+ Add task,” enter a task name, set a due date, and assign it to a team member.
Task Details:
- Click on a task to view and edit its details.
- You can add a description, checklist items, attachments, labels, comments, and set the progress status (Not Started, In Progress, Completed).
4. Using Planner Features
Assignments:
- You can assign tasks to one or multiple team members.
- Assignees will receive notifications and can view their tasks in the “My Tasks” section.
Labels:
- Labels help categorize tasks further. You can create and customize labels (e.g., High Priority, Marketing, Development).
Due Dates and Notifications:
- Set due dates for tasks to ensure timely completion.
- Team members will receive reminders as the due dates approach.
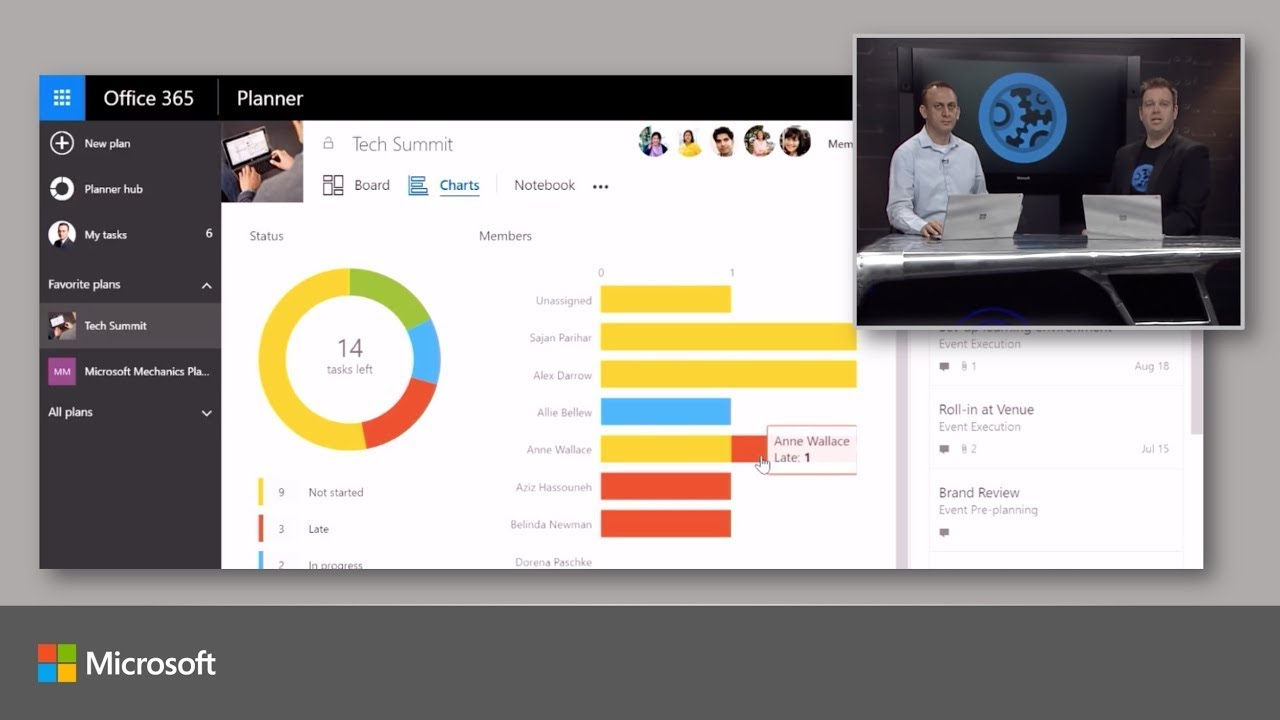
Charts and Reports:
- The Charts view provides visual representations of task status, helping you track progress and identify bottlenecks.
- You can see pie charts for task statuses and bar charts for tasks per member.
5. Collaboration and Communication
Comments:
- Each task has a comments section where team members can discuss and update the task.
- Comments are visible to all team members, ensuring transparent communication.
Attachments:
- You can attach files to tasks from your computer, OneDrive, or SharePoint.
- This makes it easy to share relevant documents and resources.
Planner and Microsoft Teams Integration:
- Microsoft Planner can be integrated into Microsoft Teams for seamless collaboration.
- You can add a Planner tab to a Teams channel, allowing team members to view and update tasks directly within Teams.
6. Advanced Tips and Best Practices
Plan Templates:
- If you frequently create similar plans, consider using a plan template to save time.
Automation with Power Automate:
- Use Microsoft Power Automate to create workflows that automate repetitive tasks, such as sending reminders or updating task statuses.
Keyboard Shortcuts:
- Familiarize yourself with Planner’s keyboard shortcuts to navigate more efficiently.
Mobile App:
- Download the Microsoft Planner mobile app to manage tasks on the go.
Planner API:
- For advanced users, the Planner API allows integration with other tools and customization according to specific needs.
Additional Resources
Microsoft Support and Documentation:
- Microsoft Planner Help & Learning
- Microsoft 365 Training
Video Tutorials:
- YouTube offers various tutorials from Microsoft and other users, providing visual step-by-step guides.
Community Forums:
- Engage with other users on forums like the Microsoft Tech Community to share tips and get answers to your questions.
By following this guide, you can effectively set up and manage projects using Microsoft Planner, ensuring better task organization and team collaboration.
Advanced Features and Tips for Microsoft Planner
7. Integrating Microsoft Planner with Other Tools
Outlook Integration:
- Tasks created in Planner can be viewed in Outlook by adding the Planner calendar to Outlook.
- Go to your plan, click on the “…” (ellipsis) next to the plan’s name, select “Add Plan to Outlook Calendar,” and follow the instructions.
Power BI Integration:
- Use Power BI to create detailed reports and dashboards based on your Planner data.
- Export Planner data to Excel and import it into Power BI to generate customized visual reports.
Third-Party Integrations:
- Tools like Trello, Asana, and others can be integrated using connectors and services like Zapier or Power Automate.
- This allows for seamless task management across different platforms.
8. Security and Permissions
Plan Permissions:
- Adjust permissions to control who can view and edit your plan.
- Public plans are visible to everyone in your organization, while private plans are restricted to invited members.
Guest Access:
- You can invite guests (external users) to your plans if your organization allows it.
- Guests can collaborate on tasks but have limited access compared to internal members.
Data Compliance:
- Ensure your use of Microsoft Planner complies with your organization’s data privacy and security policies.
- Review Microsoft’s compliance offerings and ensure sensitive data is protected.
9. Customizing and Enhancing Your Planner Experience
Custom Views:
- Customize your Planner views by grouping tasks by bucket, due date, assigned to, labels, or priority.
- This helps in quickly visualizing tasks in different contexts.
Custom Fields:
- Although Planner does not natively support custom fields, you can use labels and task descriptions creatively to store additional information.
Checklists:
- Break down complex tasks into smaller steps using checklists.
- Add checklists within tasks to ensure all subtasks are tracked and completed.
10. Managing Large Projects with Microsoft Planner
Using Multiple Plans:
- For large projects, consider breaking them down into multiple plans.
- Use a master plan to track overall progress and link to individual sub-plans.
Archiving Completed Tasks:
- Planner does not currently support task archiving directly, but you can use the “Completed” bucket or move tasks to an “Archive” bucket.
Regular Reviews:
- Conduct regular reviews of your plans to update task statuses, reassign tasks if necessary, and ensure all tasks are on track.
- Use the Charts view for a quick health check of your project.
Troubleshooting Common Issues
Planner Not Loading:
- Ensure you have a stable internet connection.
- Clear your browser cache or try accessing Planner in a different browser.
Notifications Not Working:
- Check your notification settings in Planner and ensure they are enabled.
- Verify that your email settings in Office 365 allow notifications from Planner.
Unable to Add Members:
- Confirm that the person you are trying to add has an Office 365 account.
- Check if your plan is private and ensure you have permission to add members.
Best Practices for Effective Use of Microsoft Planner
Define Clear Objectives:
- Start with clear objectives for each plan to ensure all team members are aligned.
- Use task descriptions and comments to provide detailed instructions and context.
Prioritize Tasks:
- Use labels and priority settings to prioritize tasks.
- Regularly update task priorities based on project needs and deadlines.
Foster Collaboration:
- Encourage team members to actively use comments and updates to communicate.
- Regularly review and adjust task assignments to balance workloads.
Continuous Improvement:
- Solicit feedback from your team on using Planner and make adjustments as needed.
- Explore new features and integrations to enhance your workflow continuously.
By leveraging these advanced features and following best practices, you can maximize the efficiency and effectiveness of Microsoft Planner in managing your projects and tasks. For ongoing learning and support, refer to official Microsoft resources and community forums.


